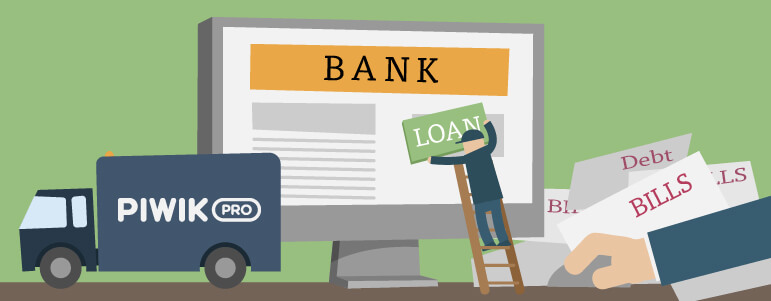
We’ll take you on a journey through the features of Piwik PRO Analytics Suite by exploring how to counter a shrinking base of banking customers with personalized banners and pop-ups. Personalization of your websites is also a great way to improve the acquisition and retention of clients, and improve cross- and upselling campaigns, but we’ll focus on the content personalization itself. You’ll see how to prepare a special offer and display personalized content on your website to a group of people you want to reach to drive more conversions and to boost your marketing efforts.
The Agenda
If you want to do content personalization the right way, you have think about more than just the message on your website. There are several other issues to address first: identifying the right audience, segmenting it, then finally setting up metrics to see if visitors are responding the way you hoped.
In our step-by-step guide we will use many Piwik PRO Analytics Suite products together, to simplify the process and by taking advantage of the strengths of each product. Here’s a quick peak at how we’ll be using each one:
- Piwik PRO Tag Manager:
- Piwik PRO Audience Manager tag: enabling form tracking
- Configuring the Analytics tag type which will be used in the Consent Manager module
- Piwik PRO Consent Manager: adjusting the popup used to acquire user consent
- Piwik PRO Audience Manager (Customer Data Platform): create an audience based on submitted forms and selected options
- Piwik PRO Personalization: configure and display a customized banner to a specific audience
- Piwik PRO Analytics: measure impressions and interactions with the personalized content
The scenario
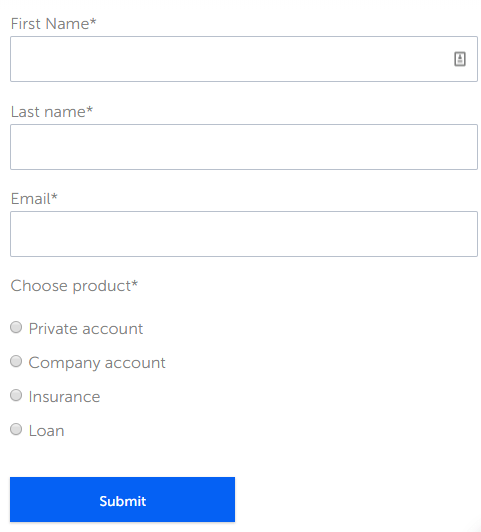
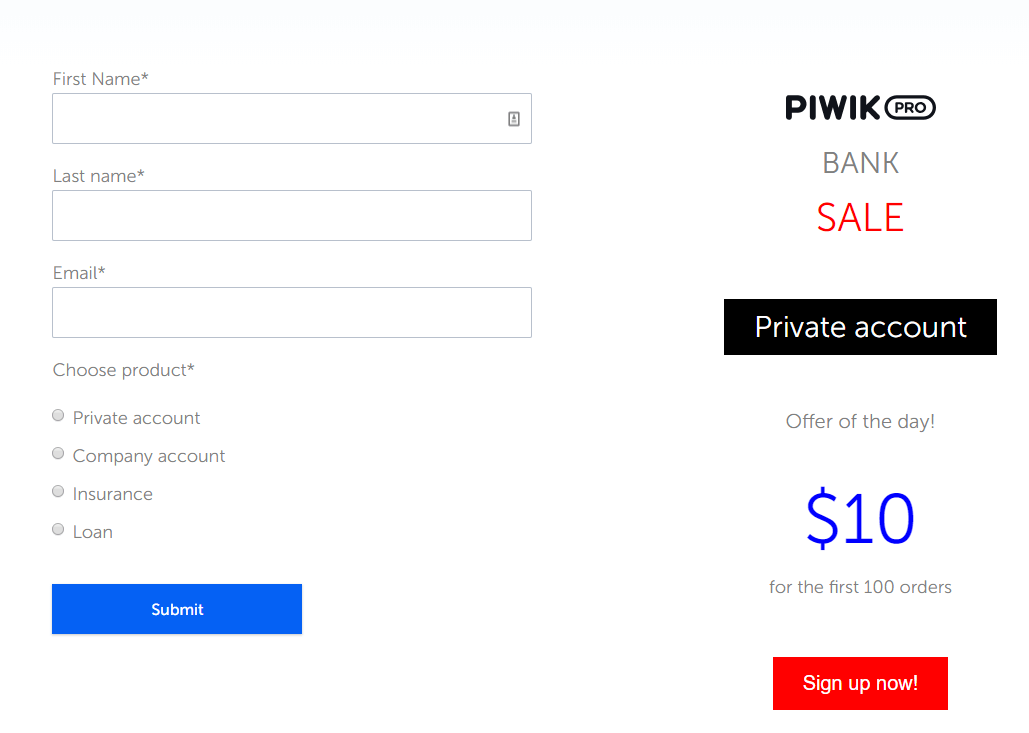
We want to display personalized content for people who filled and submitted a form, and chose the Private account option in the Choose product part of the form. The form would look something like this:
Let’s assume that the people who filled it out are not yet clients. They are gathering information and filled out the form as a way to express interest. We’ve done our market research and we know how to talk to this audience to nudge them towards buying from us. A special, personalized offer with targeted copy should do the trick.
Now let’s begin with the configuration.
Step 1: Configuration of the Tag Manager
First we have to start with Piwik PRO Tag Manager to create a dedicated Piwik PRO Audience Manager tag. Why? Because this tag will allow us to track the website forms and gather the data filled in by users.
Free Comparison of 6 Enterprise-Ready Tag Management Systems
Get to know the 40 key differences between Google Tag Manager, Tealium, Segment, Adobe Dynamic Tag Management, Ensighten & Piwik PRO:
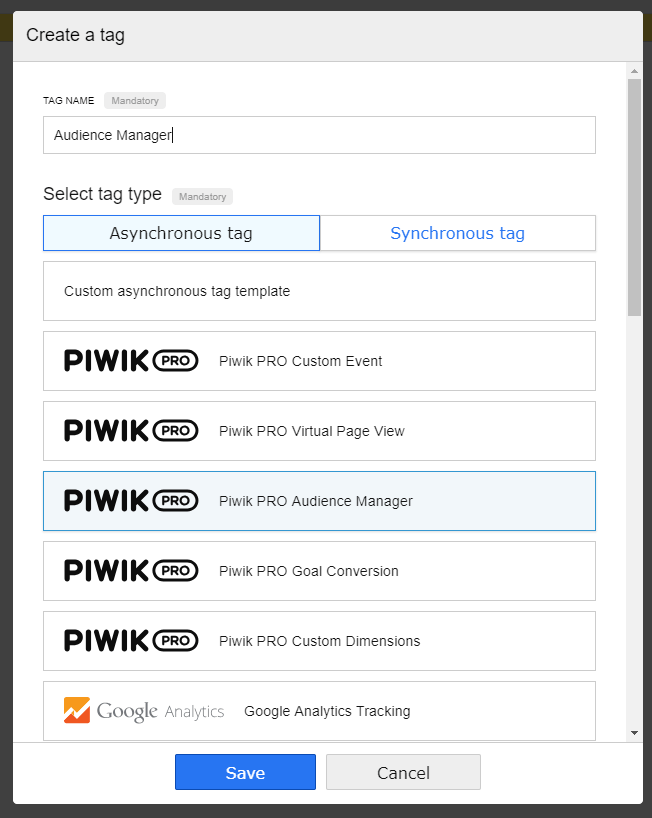
Configuration of this type of tag is simple. Choose the right template in Piwik PRO and set the name. We’ll call it Audience Manager (you can chose a different name, but keep in mind – it’s a good practice to choose clear and easy-to-identify names so you’ll be able to recognize them later).
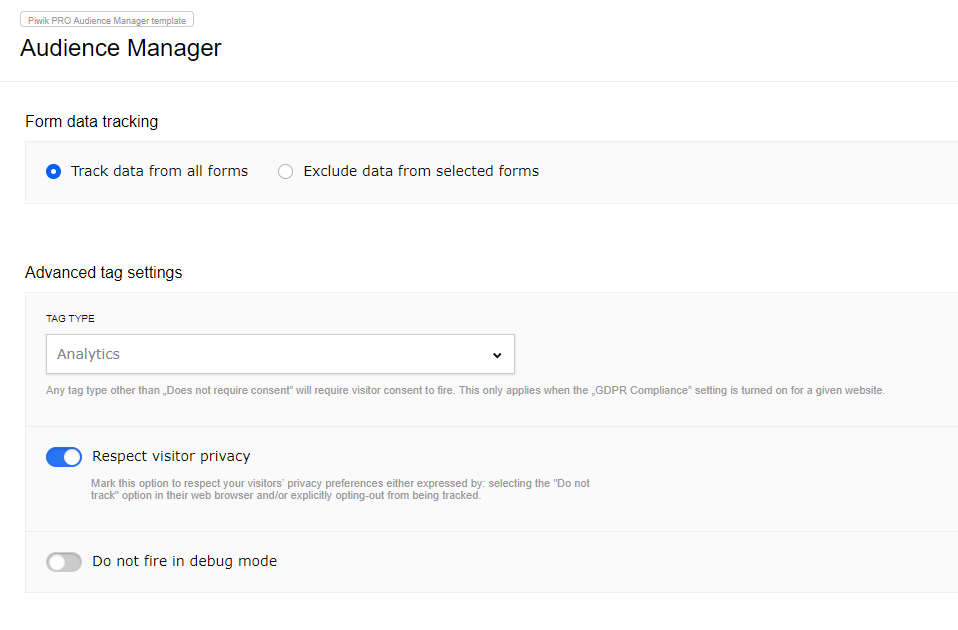
Now let’s decide if we want to track data from all forms or exclude some of them – we’ll track data from all forms. Next, select the tag type, which will be used for the Consent Manager configuration later. In this case the best option will be Analytics (and we’ll come back to this in the next step).
We want to respect user privacy, so we leave the option Respect visitor privacy enabled.
To complete the configuration we have to set the trigger of the newly formed tag. Let’s just set it for pageviews of any page:
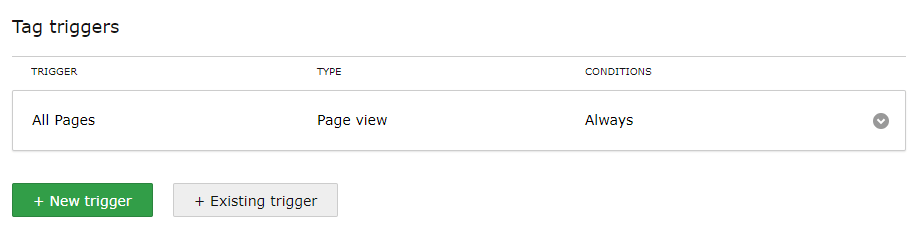
Now we can Save the configuration, Publish the changes to finish up in Tag Manager..
Step 2: Consent Manager – the setup
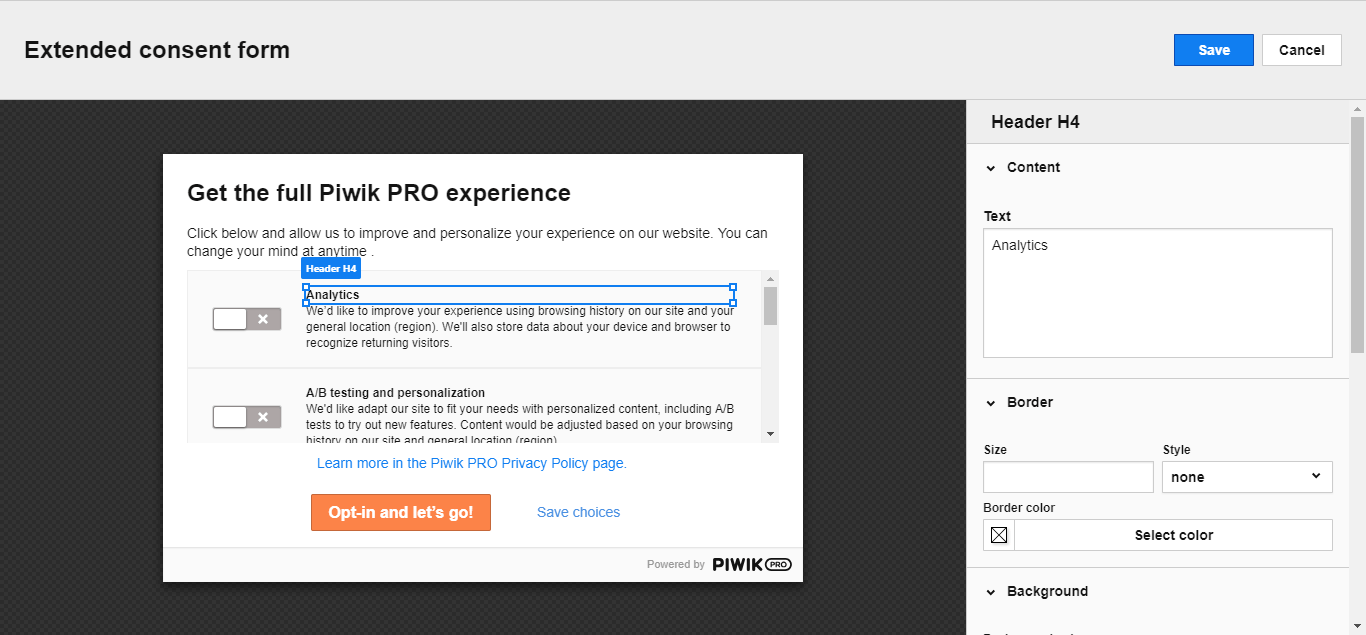
While configuring Tag Manager during the first step, we set up the tag type to Analytics. Those types of tags are used in Piwik PRO Consent Manager. Your visitors will receive a consent form asking for permission to collect data for a defined set of purposes (which you can specify and update at any moment). And until the consent is given, certain categories of tags won’t be fired.
Consent Manager will automatically distinguish new visitors and returning ones who already gave consent. For returning visitors who didn’t give respond to the pop-up, a top or bottom bar will be displayed to remind them about the opt-in process and the advantages of providing a response.
A Practical Guide to Acquiring Consent in the Age of GDPR
Read our exhaustive guide on collecting, managing, and storing user consents, plus learn the ways GDPR Consent Manager can help you remain privacy compliant
So if a visitor does not consent to the Analytics category, we won’t be able to collect data from the form we previously created. But we’ll assume that at least some of the visitors will opt-in, and our new tag will be fired exactly when we want it to.
The Piwik PRO Consent Manager mechanism shows the categories of tags that are used in Tag Manager. You can edit the categories themselves, as well as their title and description. If you’d like to find out more about Consent Manager, check out this website.
Tip: Create as short a description as possible – an overly wordy description will look bad and possibly decrease the opt-in rate.
During the fourth step of this guide (configuration of Piwik PRO Personalization) we’ll use the A/B Testing and Personalization tag type as well. This category will appear in the consent pop-up so we also need to write a nice description of it so that users will consent.
Step 3: Audience Manager
Now that we’re warmed up let’s move on to configuring the Audience Manager (Customer Data Platform). There is a technical step involved, but you’ll see that it’s not so hard in the end.
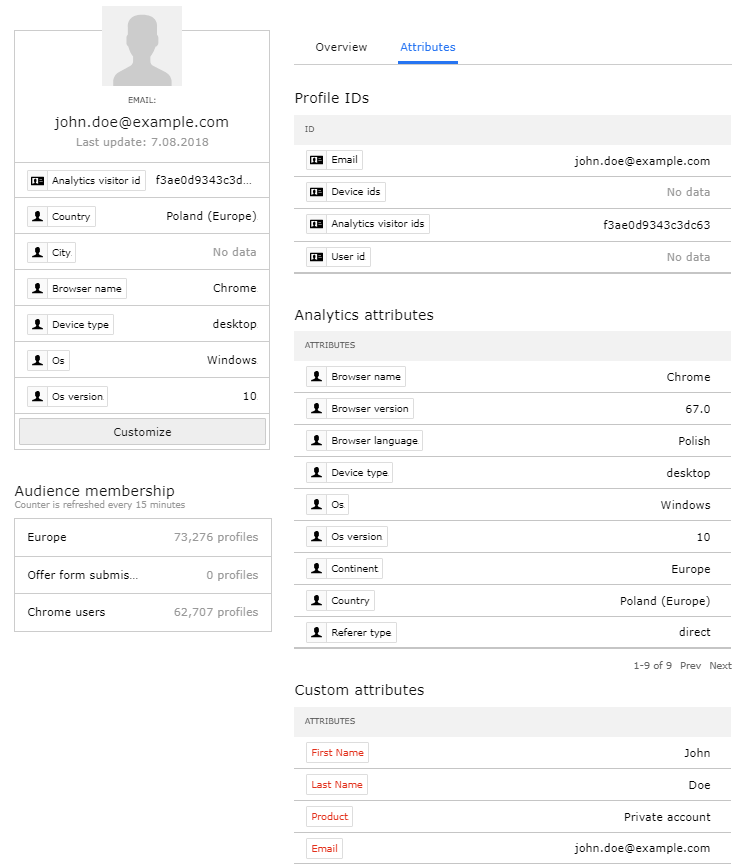
The form we created at the very beginning of this guide is our base for data collection. We want to collect the first and last name of each visitor, their email address and the product they are interested in. And because we configured the tag responsible for form tracking earlier, Audience Manager will collect information from each field. The data from the email address field will be set as the Profile ID.
Free Comparison of 4 Enterprise-Ready Customer Data Platforms
Get to know 25 key differences between Tealium, Ensighten, BlueVenn and Piwik PRO to find out which platform fits your business’s needs
Step 3.1: Gathering the data
After submitting the form, Audience Manager will track the visitor and enrich standard Analytics data with the values of form inputs:
Let’s get a bit technical for a moment. The names of those custom attributes are set automatically by the Audience Manager, which uses the name attribute of the input element:
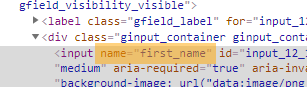
So if the form is configured correctly, names of the attributes will automatically be clear and readable.
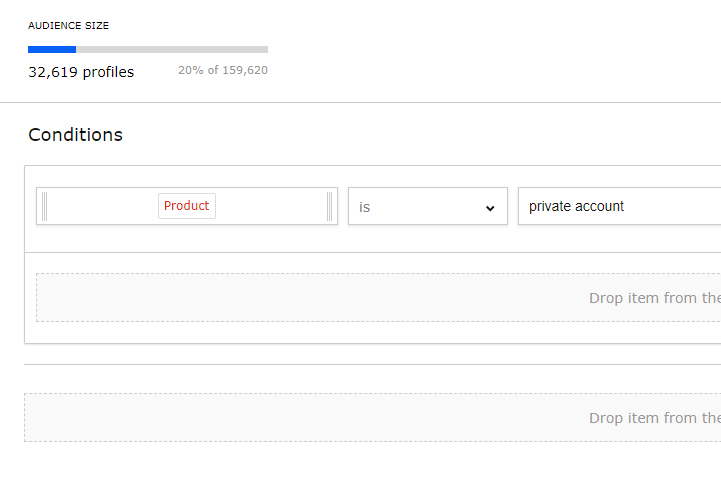
Step 3.2: Creating the audience
Once we have the value for the Product attribute (people who selected the Private account option when filling out the form) we can configure the audience for the next step – Piwik PRO Personalization. But the following audience could be used not only in Personalization, but also during the configuration any Tag Manager trigger to fire tags only for visitors from this audience.
Step 3.3: Connecting data from different sources
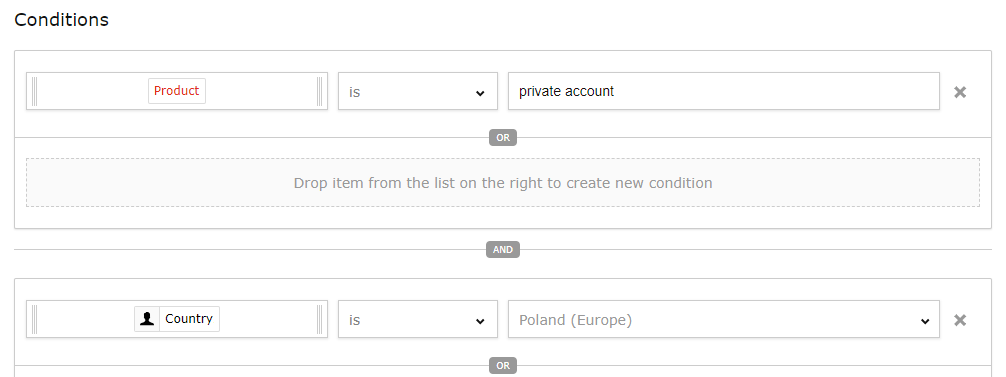
Now we have to take a little detour. In the previous steps we created the audience based only on one user selection (those who selected the Private account option). But because we are using the several products in Piwik PRO Analytics Suite, we want to also connect this information with data from Piwik PRO Analytics.
This means the audience we already have can be segmented further using analytics attributes. For example, we can segment them by country:
We can go further and import offline data from a CSV file. You can use data from any e-commerce system or pull it straight from online lead capture forms. You can find out more about enriching profiles & audiences here.
Step 4: Personalization – activating the data
We finally reached the place where all the magic happens: Piwik PRO Personalization. Here we’ll use the data we gathered to create and present the personalized content to the target audience.
Let’s start with the banner configuration. The following example is fictional (hopefully that’s obvious…), but it’s purpose is to show you the possibilities and basics of how Personalization works.
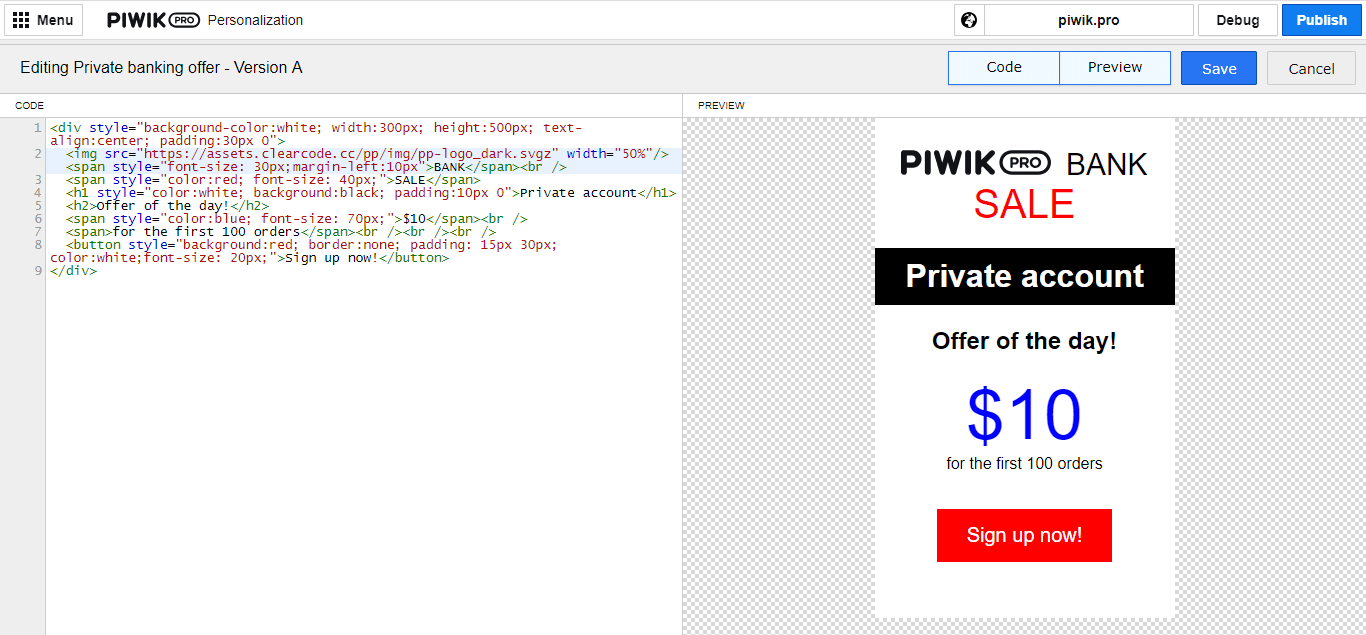
Once we create the content for the banner, we need to create space for it on our website. This means preparing a place for it in our website code by creating an empty div element with a specific ID.
In our example we don’t want this div to be empty, because it will be replaced with the personalized banner when someone from our audience will land on the website.
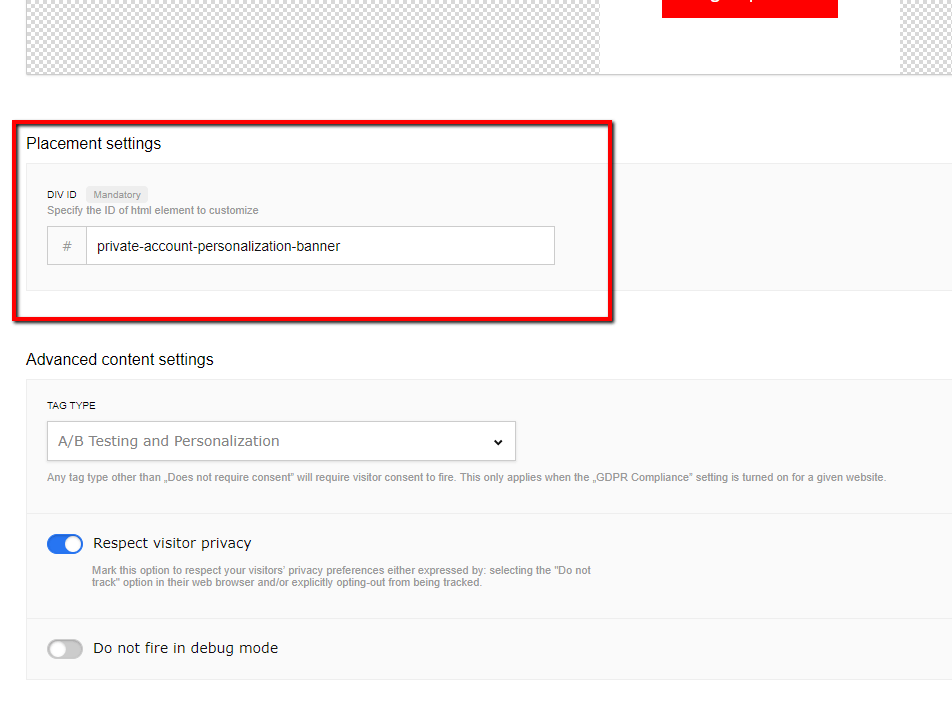
Tip – The ID value of the mentioned div element has to be easily recognizable and correspond to the design created within the Personalization tag. Remember, in time, you’ll have tens or even hundreds of tags and div elements, so use clear naming convention from the beginning.
Now we have the audience that we want to target, we have the content for the banner and we have a place for it. We can finish the whole configuration by creating a trigger based on our audience:
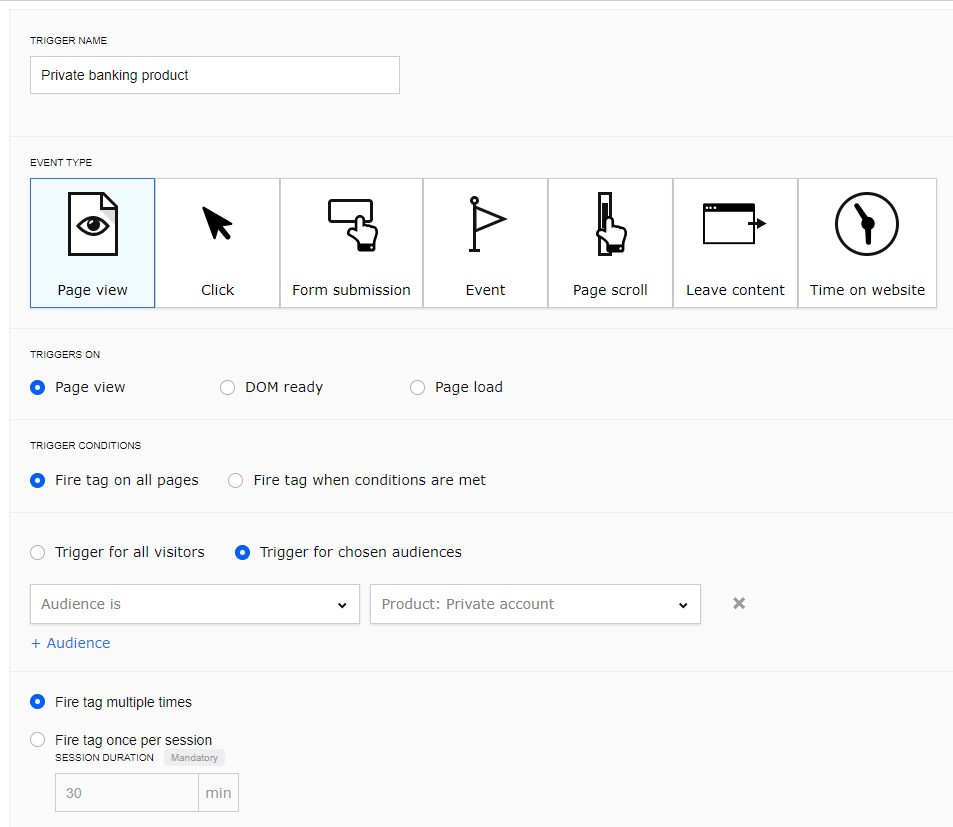
We have chosen the Page view tag type to display this banner every time a user reaches the place we designated in the website code. That’s why we have also chosen the Fire tag multiple times option. The only limitation on this trigger is our predefined audience – just like we planned.
Now can we see the results? Not just yet!
Step 5: Testing it out!
It’s better to be safe than sorry, so let’s find out if our banner is actually working. It’s testing time!
You can do this using the incognito (private) mode on you browser First, we’ll find out if a new visitor sees the personalized banner. They shouldn’t see it, as the image below confirms, they just see the form:
Now, we submit the form (and select the Private account option) and refresh the page. We get quite a different view, with the personalized banner:
Eagle eyed readers will spot some minor differences between the Personalization tag configuration and the final banner. Why the differences? Because of a discrepancy between the additional website styles and the personalization tag configuration. That’s why it’s a good practice to test out the HTML on the website itself and then copy the code into the personalization module.
Final Step: Time to Analytics
Now that everything is configured and working properly we can gather results to find out how our personalized banner is performing using another part of Piwik PRO Analytics Suite – Piwik PRO Analytics.
Free Comparison of 5 Leading Web Analytics Vendors
Compare 40 Variables of 5 Leading Enterprise-Ready Web Analytics Vendors:
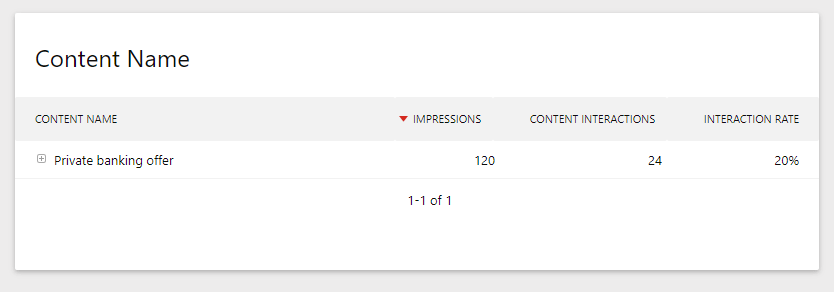
So after waiting a few days (or weeks – it’s up to you to set the timetable for your personalization test) we can check out Piwik PRO Analytics and go to Actions > Contents report. Here we can check all the impressions and user interactions (calculated into the interaction rate) for our configured piece of personalized content:
When choosing to test some personalized content it’s good to create a version you can compare your personalized content with. It could be the original website, or you can create two versions of the banner and get data on the performance of both.
You can find out more about content personalization on our blog post, where we teach you how to unlock its full potential.
Conclusion
The goal of this blog post was to be your guide through the whole personalization process using all Piwik PRO Analytics Suite. We learned how to segment existing clients, create personalized banners and measure the effectiveness of personalization efforts. We also explored how each part of Piwik PRO compliments the others and that allows you accomplish more with less effort.
If you want to learn more about Piwik PRO configuration and how content personalization can help your business, don’t hesitate and contact us. Our sales team will be happy to answer any of your questions.