
Digital marketing has come a long way. It became more and more complex and demands that marketers be able to coordinate and manage a vast number of tools to get the most precise and insightful data. This often means that the marketing team can lose control of part of their work, as they need the help of their development teams, especially when it comes to messing with a website’s codes.
On the other hand, tag management systems can effectively put digital marketers back in control of digital marketing data. Web analytics can become simpler and more efficient, as most actions which required access to your website’s code can now be performed with minimal technical expertise, without the IT’s team help.
So it’s no wonder that Josh West of Analytics Demystified highlights the usefulness of tag management solutions for web analytics saying: The truly great part of tag management is how it has “democratized” digital marketing.
In what way, you might ask? It’s really simple: Tag management tools have broken down the walls not only between IT and marketing, but also between individual teams within marketing as well […].
Still, you might not be convinced. “Taking back control”, “democratizing digital marketing” – it all sounds a bit vague. And I couldn’t agree more.
It’s one thing to theorize about the advantages of pairing web analytics with tag manager, but showing concrete examples is something completely different. So, why waste your time on introductions – let’s get right into it!
Here are two big reasons showing you in detail how to use a tag manager with web analytics and how to benefit from their cooperation.
Free Comparison of 6 Enterprise-Ready Tag Management Systems
Get to know the 40 key differences between Google Tag Manager, Tealium, Segment, Adobe Marketing Cloud, Ensighten & Piwik PRO:
Are my articles engaging enough? Tracking Events with a Tag Manager
Let’s start with a simple example of finding out whether your content is engaging enough to convince your visitors to check out your social media channels. This is a question often asked by marketers, but it’s really hard to properly measure.
It’s one thing if you know, that your article/blog post went viral, but to see if people are visiting your social media pages, learning which social media channel is the most popular, learning where you should promote your content – that’s a whole other question. Thankfully the duo of a Tag Manager and Web Analytics can handle this challenge.
So, you’d like to measure the level of visitors engagement and focus only on your blog (or any site, where you publish your articles, but for the sake of this example, let’s say – blog). Is there any link between the popularity of your blog posts, and new visits, likes and followers on your social media channels? Maybe a certain blog post really motivated your visitors to check out your social media channels and you should write more articles like that? Or maybe there is no connection between the two, and all your efforts were fruitless?
These are all interesting questions. And with the help of Piwik PRO Event Tracking you might be able to get all the data you need to answer them. But Piwik PRO Tag Manager makes reaching that data and answering those questions easy as pie (or a walk in the park if you prefer a healthy lifestyle).
What to do?
First things first – you have to have your web analytics tracking code implemented, and integrated with your Tag Manager. But I think we both know this was obvious.
So the first “real” thing you have to do is to specify what you really want to measure. “Engagement” is a big word, and it can mean a lot of things. Specify your needs. You want to learn how many visitors choose to visit your Facebook page after reading an article on your blog. So you want to focus only on clicks from your blog (from every blog post on your website), even though you have your social media buttons on almost every page on your domain.
Great, now we know what we’re dealing with and we can easily create a tag to track exactly this. In order to create is we can use this simple template:_paq.push(['trackEvent', 'Event Category', 'Event Action', 'Event Name’, Numeric Value]);
This function has four variables: event category, event action, event name and numeric value. Of those four variables the last two are optional, so remember – you don’t have to specify them (and we won’t do it in our example). If you want to learn more about Event Tracking, be sure to check out this Ultimate Guide.
Remember: a Piwik PRO event needs to be wrapped up in the <script> tags in order to work properly. So our Piwik PRO event code snippet will look like this:_paq.push(['trackEvent', 'Click', 'SITE URL']);
Now, once we customized our template, we can go on and continue with Tag Manager. Click on the Add a Tag, then name it, so it it will be easy to find later (If you want to edit it, re-use it, or delete it).
Choose asynchronous custom HTML tag, and insert the snippet from before.
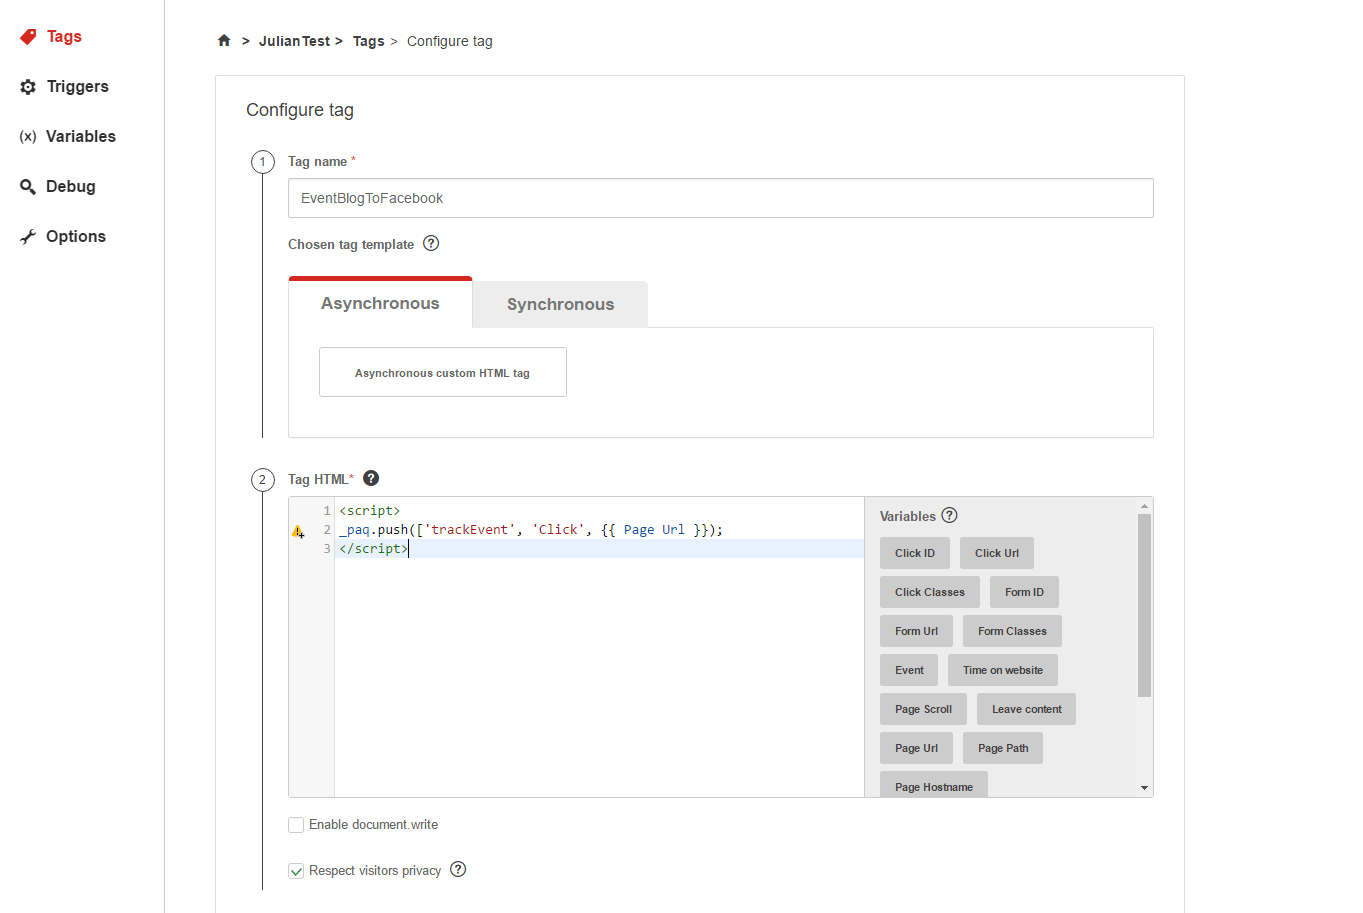
In the place of “Site URL” choose the variable from the list on your right. For our example, we want to group reports by the different page urls, so choose that one (Page Url).
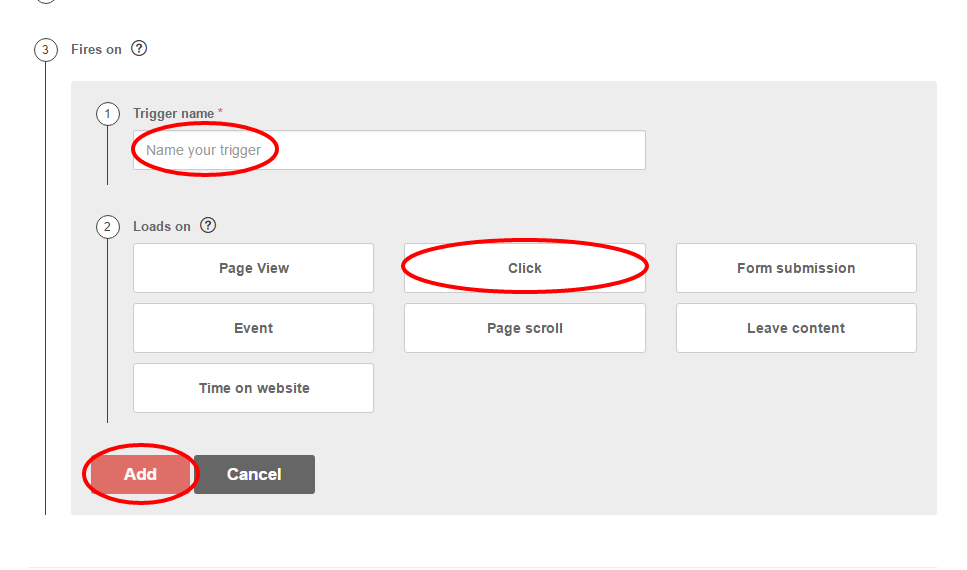
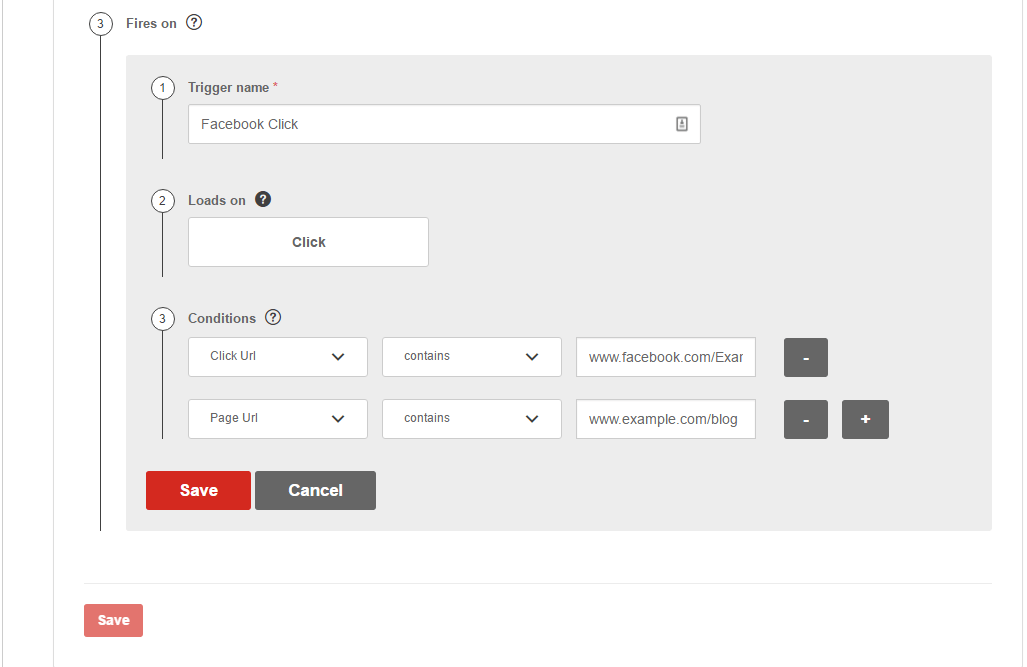
So now that we have our event, all we have to do is specify when should it work. It’s about time to add triggers. Create a new trigger, add a name to it (so you can use it when creating different tags) and specify it. The event should load on Click, and there should be some conditions. The event should only be counted on your blog, so set the click url as “contains” and add the part of the url, which applies only to your blog post. Let’s say it looks like this: www.example.com/blog/.
We configured the url in this way assuming that each and every blog post starts with the same URL: www.example.com/blog/. But, this will not always be the case, so be sure to specify the conditions correctly in order to get proper results.
The tag should fire only when visitors click on the Facebook button. It’s good to check your website’s code, because to do this, we must use DOM elements (pieces of HTML and CSS source code describing the button) found in the source code of the page.
You can find out this information easily by “inspecting” the page. In Chrome all you have to do is right click on the button and choose inspect element. This is what we should see:
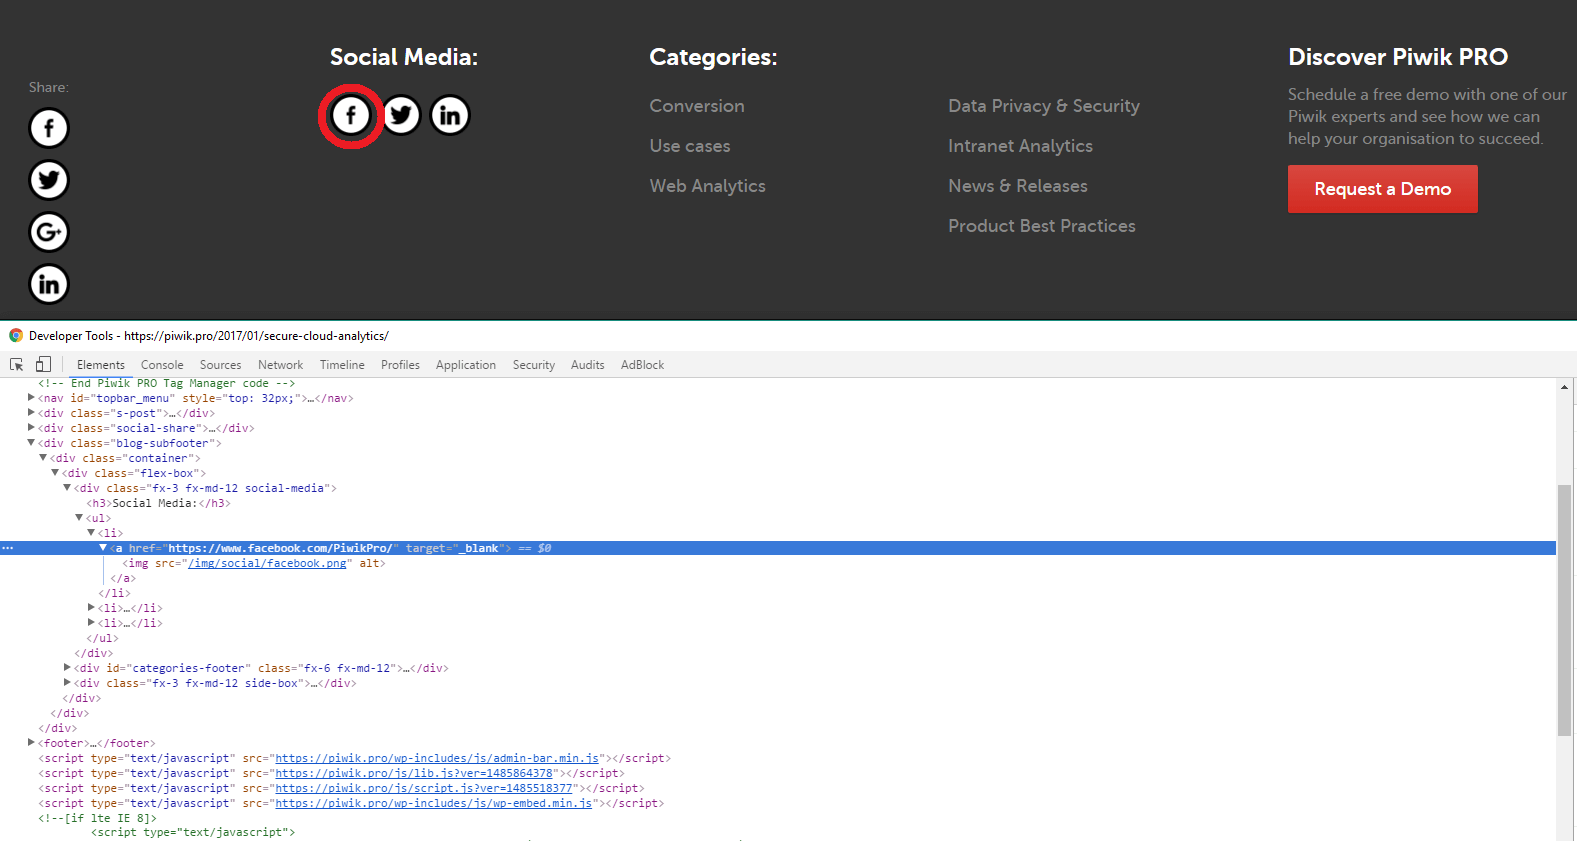
In this case there is no CLASS, just the URL. So we copy the specific URL in the second condition specifying it like that: click url contains and here we insert the url
There are three more clicks ahead of you. Save the trigger, save the tag and finally click Publish at the top of the page.
And there you have it. Now in Piwik PRO your report will display information about all clicks on the Facebook button from your blog posts and you’ll be able to see which blog post generated the highest number of clicks. What’s more, you’ll be able to check the visitor log and analyze how your visitors behave before clicking on the Facebook button.
But that’s not all, as the reports will allow you to measure growth in your visitors’ engagement levels by choosing the insights option, which lets you compare the chosen time period to a previous one and filter the results to focus only on improving or declining metrics. You can also easily compare the results of each blog post using Piwik PRO Comparison Dashboard. Learn more about this useful feature from our user guide.
That’s a lot of important insights gathered quickly and without having to beg your development team for help.
How can I optimize my campaigns? A/B Testing with Tag Manager
Let’s move on to the next use case. Here, we will see more advantages of integrating a tag manager with other web analytics tools or optimization software.
Let’s go ahead and think about the experiments we run constantly on our web pages. You might think of yourself as the high and mighty, know-everything kind of guy who knows exactly how to structure a sentence so every user who reads it will be instantly mesmerized and will click the CTA on your landing page. But, just for the moment, let’s imagine that there is a slight chance that you might be wrong! So maybe – just maybe – you might want to create an experiment!
Yes!
First we create a A/B testing scenario, and then configure our whole campaign in Optimizely. To do this you have to start New Experiment, insert Experiment Name, set the Experiment URL and Create Experiment. Then you have to configure what the variation will look like.

I will not go into further detail, as we have a great guide on how to launch A/B tests using Piwik PRO and Optimizely. So check it out, and let’s continue from the moment, you finished creating the experiment.
What should I do after creating the experiment in Optimizely?
We arrive at the point where a Tag Manager can once again show you its usefulness. As you know, there is an Optimizely Integration in Piwik PRO. But, without the help of Piwik PRO Tag Manager you’d have to edit your website’s source code to put the Optimizely snippet into the head section. You’d have to contact the development team again and again and you would no longer be in control of the process.
.
But thanks to one of the many useful features of Piwik PRO Tag Manager, you can easily add Optimizely code to your website. This feature is the ability to add synchronous tags.
*Of course, we are assuming that the Piwik PRO Tag Manager code has been implemented earlier – we need IT assistance only once at the beginning.
It is really easy to configure Optimizely in Piwik PRO Tag Manager. All you need is to do is first: create a new tag (just like in the examples before), by clicking add a tag button. Then (again) remember to create a proper name for the tag, so you’ll be able to find it anytime. And now, finally, something new – choose the synchronous option and click on Optimizely.
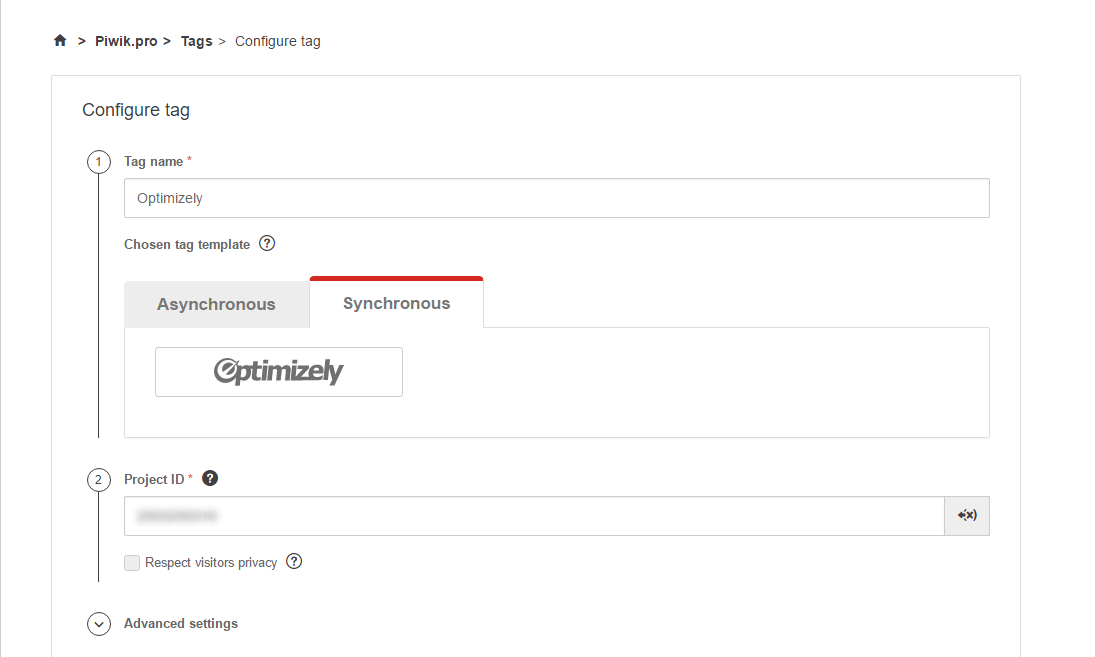
Now find the Project ID number you got earlier when creating the experiment. If you’re having some troubles with that, you can find this number on your Optimizely account page, in the settings options, under the snippets details.
Once all of that is done, we can focus on the important part – when the tag should be fired, when should it work. In our example, we want it to fire on every page, where the optimizely project ID is, so all we have to do is to create a trigger, name it properly, and specify it to Fire tag on all pages. Then we click save and publish.
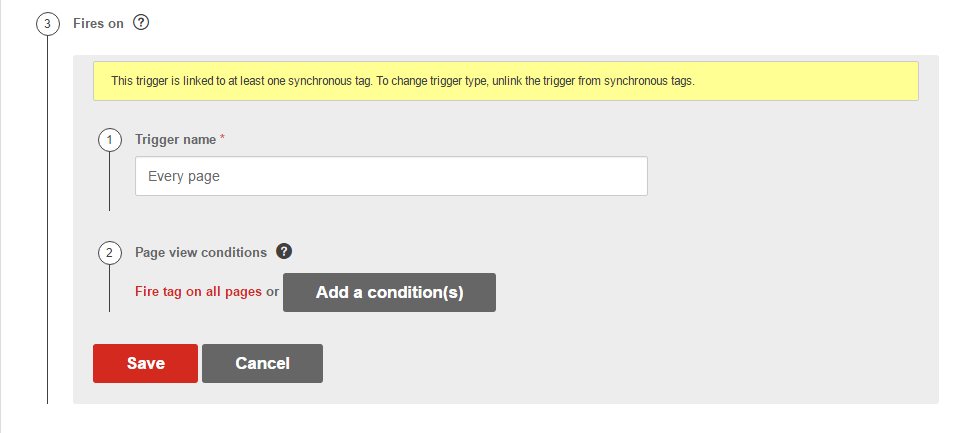
Important! You might encounter such a notification:

It reminds you, that for the synchronous tag to work, first there needs to be a working asynchronous tag published on those same web pages.
And there you have it. Simple isn’t it?
It’s easy to notice the advantages of using tag manager with Optimizely, but let’s recap them (in case you missed it):
- hassle free integration and deployment of optimizely synchronous code,
- more flexibility when it comes to optimizely customization and a/b tracker management.
And this is just one, fairly simple example.
Don’t Be Afraid of Combining Your Tools
As you can clearly see, pairing a tag management system with web analytic tools is not just a good, revolutionary idea. Today it’s a decision you should’ve already made at least a year ago.
Regaining control over your analytic endeavours, saving time and energy so you don’t have to constantly be at the mercy of IT teams, implementing your campaigns easily, with minimum technical expertise. This all means that adding a tag manager to your digital arsenal will make your work more efficient, while at the same time letting you access even more adequate and precise data. If you still have doubts, don’t hesitate and contact us.
Free Comparison of 6 Enterprise-Ready Tag Management Systems
Get to know the 40 key differences between Google Tag Manager, Tealium, Segment, Adobe Marketing Cloud, Ensighten & Piwik PRO: