Data analytics has many layers, from page views and bounce rates to time spent on-page. But aggregated data doesn’t capture the full image of your visitors’ activity.
Whether you’re running a medium-size e-commerce site or a multinational enterprise, you want to learn how guests behave on your website. Are they reading the blog? Do they like it? Are they clicking on social media buttons? Has anyone watched the tutorial prepared especially for prospective customers?
Or maybe – what’s more important – what if they aren’t reading your blog posts, or they put their name and email address into the contact form but didn’t click “send”?
This is valuable information you should have if you care about optimizing the website experience for potential visitors.
Sadly, most tools work by recording instances when a user opens or moves to a new URL. This doesn’t happen with on-page actions, and that’s when event-based analytics and Piwik PRO come in.
If you’d like to learn more about even-based analytics as a general practice used by many analytics platforms on the market, visit this post: Everything you should know about event-based analytics
What is Piwik PRO event tracking?
Event tracking or event-based analytics records what a visitor is doing on your website, whether it’s clicks, scrolls or even cursor movements.
With event tracking a range of actions can be recorded on your website, such as:
- clicks on non-clickable (and clickable) elements
- using video and audio players
- scrolling
- exiting a page
- filling out a form without submitting it
- downloads
While these actions don’t bring users to a new page, they can still be recorded to give you a better idea of how people use your website.
When to use event tracking?
It’s great that you know what event tracking can do, but what’s more important is knowing when to use it. It’s the perfect tool for capturing visitors’ behavioral patterns and understanding them. Knowing visitors’ Click Path can only reveal so much.
Event tracking analytics is especially useful if you want to learn about engagement levels.
Use this whenever you want to optimize your website’s performance and learn what its most (and least) engaging elements are.
This can expose subtle criticisms from users on your page – they entered, but nothing excited them enough to go any further.
Many analytics users choose URL parameters (like UTM or PK) to track exactly this type of user activity. However, this might not be the best idea, especially if you’re tracking links that lead to other pages on the same website. By doing so, you will lose important data on referrers – the report will state that those users came from your website, and not the real source.
If there is a better and more transparent way to do it, why risk losing information about where traffic originally came from?
Tip: never get too comfortable with a high number of page views and a low bounce rate. This doesn’t mean that visitors are engaged or reading every word of your content.
How to use event tracking?
Let’s get down to the mechanics of event tracking and how to implement it on your website. The rest of this post focuses on real examples you can use and building reports with the new data available.
Create tags in Tag Manager
Custom event tracking starts with tags. Set up tags in Tag Manager with the proper triggers that allow you to create and begin tracking important events. Here’s how to do it:

After selecting “Piwik PRO Custom Event” you’ll see the custom event setup interface.
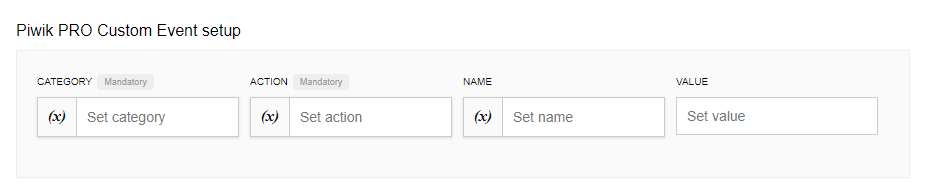
This has four variables: event category, event action, event name, and numeric value. The last two are optional.
These options aggregate and separate events – category, action, and name (this will influence your reports).
Tip: Establish a naming convention when creating custom events. Use a standardized template or a set of rules, because events will be organized in reports depending on how you complete this setup form (even case sensitive).
Marketing and development teams will both benefit from Tag Manager – developers won’t spend time implementing tags for marketing, and marketers will have the freedom to create custom events, experiment, and get clear event-based reports.
Event-tracking analytics has limitless applications, so let’s start by looking at a few examples of trackable custom events. After that, we will look at some reports created using this data.
Tracking button clicks
You can find buttons on every website. So that’s where we begin with our efforts. This might be the most common situation where event tracking can provide us with insight into your visitors’ engagement.
Want to learn how many people have clicked on the “CONTACT” button in your blog posts? All you have to do is create a tag and trigger configuration in the tag manager.

Select the “NAME” variable {{ Page Url }} and the page the event is tracked on will automatically pass the URL.
For example, if the same button appears in multiple locations, this option will take the name of the specific site the click occurred on.
The output for this event in a report will look like this:
- Event Category – Button
- Event Action – Click
- Event Name – https://piwik.pro/blog/event-tracking-ultimate-guide/ (this will change depending on the page where the click took place)
This makes it easy to find the right report and aggregate the data. The category “Button” is broad enough, so you can add tracking from other pages and still get precise insight within the report. If you follow the naming convention, you will have an overview and the ability to dive deep into specifics.
Trigger configuration
Events and triggers go hand in hand. To set up the trigger, find the button you want to track on your page and look at the HTML code.
For our example the button’s code looks like this:

You need the following information to configure the trigger:
- Link class (a class=) contains “btn”
- Link URL contains “piwik.pro/contact”
Now input this info into the trigger settings:
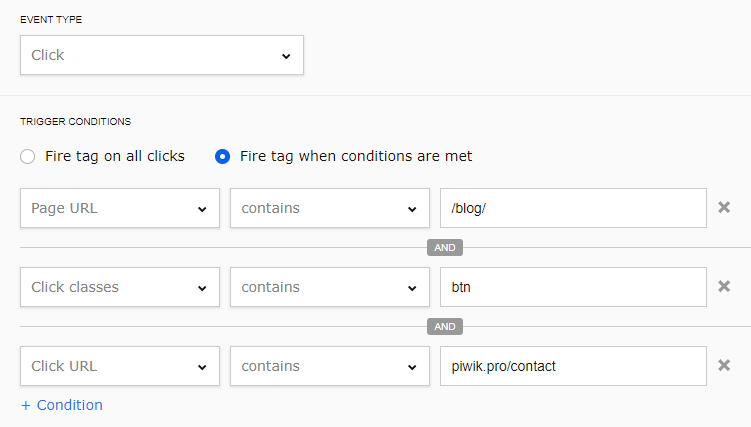
This configuration creates a Click-type trigger that only fires when links that contain <a class=”btn”> to the contact page are clicked on the site’s blog. The result is a recorded event anytime someone clicks the contact button from your blog.
What other events we can create?
Recording page scroll
Scroll tracking sets tag firing points based on page height. You can create as many breakpoints as you want, but don’t overdo it. Typically, 3-4 points are enough to get the insight you’re looking for.
We use four tags on our website: 25, 50, 75, and 100 percent. Important elements of your site can correspond with them (e.g. a video at 60%, or a pop-up button that appears after scrolling through 75%).

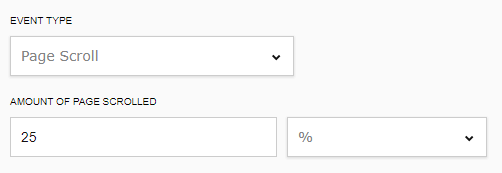
In our case we’ll configure the event to be:
- Event Category – Scroll
- Event Action = 25% (scrolled)
- Event Name =
{{ Page Url }}
Setting up the trigger is very simple. Just select the event type “Page Scroll” and the amount, in this case 25%. The configuration for the other triggers will be the same, only changing the “Amount of page scrolled” percentage. You can also measure scrolling by pixels if necessary.
This could be especially useful for tracking how visitors scroll through articles and blog posts, where the comment sections can expand and change how much scrolling visitors need to finish reading the whole text.
You shouldn’t apply scroll tracking universally. It’s not the “one tracking tool” to fix every problem and provide a total understanding of user engagement. For instance, why use it on short pages? What would it tell you? Maybe in those cases consider focusing on time spent on your page.
COMPARISON
The comparison of 10 web and app analytics platforms
Learn the key differences between Piwik PRO Enterprise, Google Analytics 4, Matomo Cloud, Adobe Analytics, AT Internet, Countly Enterprise, Mixpanel Enterprise, Amplitude Enterprise, Snowplow Enterprise, and Heap Premier.
Keep track of form submissions
Here’s a situation where event tracking helps find issues with a common element on websites – a form that needs to be filled out.
Forms are all over the internet: contact forms, free trial forms, download forms, and registration forms, just to name a few. People engage with them differently depending on the wording, structure, number of fields, etc.
This gives you a great opportunity to better understand visitors’ actions by learning how they react to your forms. Let’s take a look at one example:

Using the variable name “Form Name” will input the page name based on the event location.
Set up the triggers based on form submission:
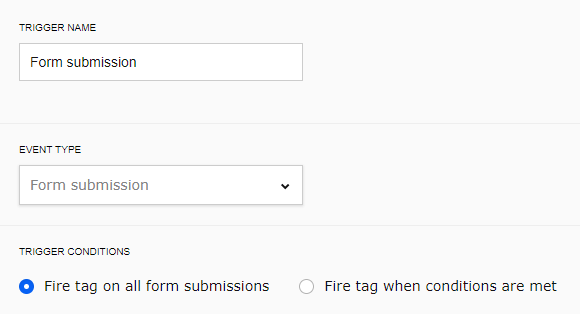
In this case, the tag fires on all form submissions, but specific forms can also be tracked:
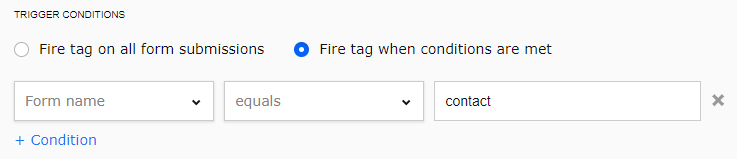
You can exclude forms from being tracked depending on your needs.
Let’s assume you have a registration form with five elements to complete: Name, Company, Phone Number, Address, and Email.
You know how many people have registered, that’s an easy one, but how many started completing a form and never finished? What’s the number of people that entered their name and email address but none of the other data?
This is valuable information – maybe consider form optimization by changing or eliminating some fields. You’ll never know what to do without data to back up your intuition.
It’s possible to track if a user has filled out any of the fields in your form. Every time they complete a form or select the autofill option, Piwik PRO creates an event.
Take a look at how to create a goal in analytics for tracking contact form submissions, for instance:
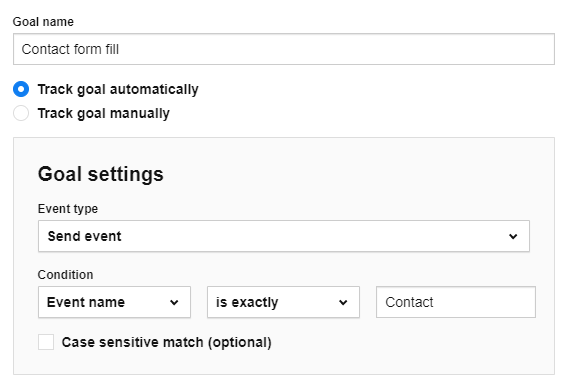
This is especially useful when it’s not possible to present a “thank you” page immediately after form completion. You will also gather valuable insights that could help improve submission rates.
If you see the same blank elements (Company Name, Phone Number, etc.) coming up often, try eliminating or making them optional, then check the results.
Maybe you have too many fields in the form, or a particular piece of information you’re asking for is discouraging users.
This event report could also present other issues, even technical ones. A high number of visitors completing the form yet still not submitting it could point to a technical problem with recording the submission, or even suggest a rethink of the entire process.
Remember that your team can modify the conditions for events you want to track in similar situations. For example, the activities of visitors that don’t send the form at all. This could save time and deliver even more accurate data.
Using event tracking data
Building event reports
It’s one thing to implement event tracking and another to analyze the reports. We’ve already mentioned how important it is to have a naming convention for creating events, and now we’ll see why.
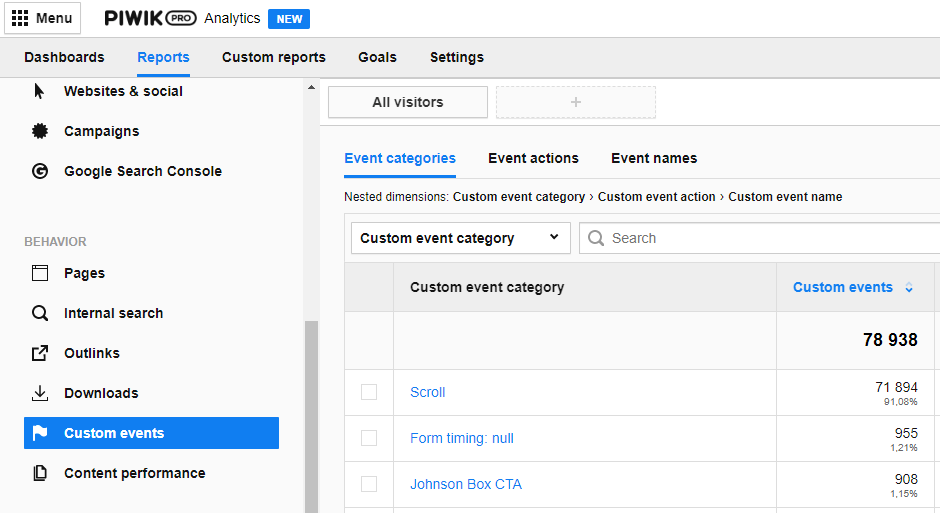
In Piwik PRO reports can be organized by event categories, actions, names, and you can choose or compare particular segments. This provides many options to find the precise data you’re looking for.
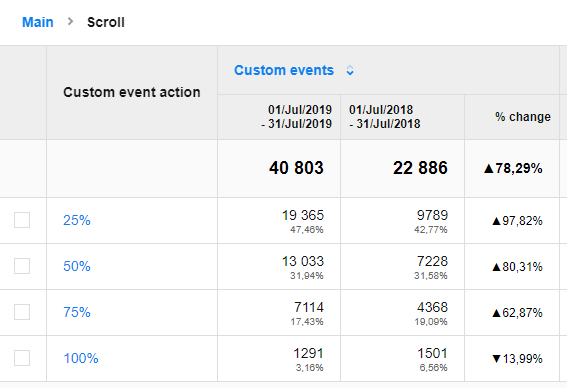
Check out how to create a report based on a “custom event action” that shows pages that have been scrolled at least 50%:
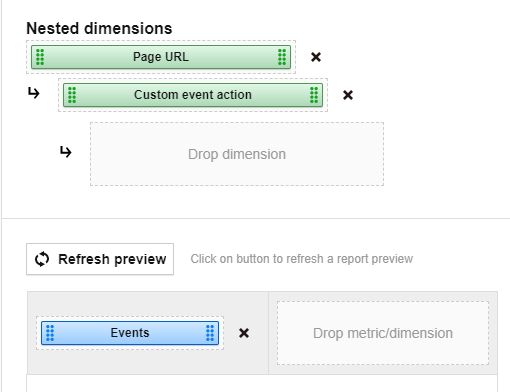
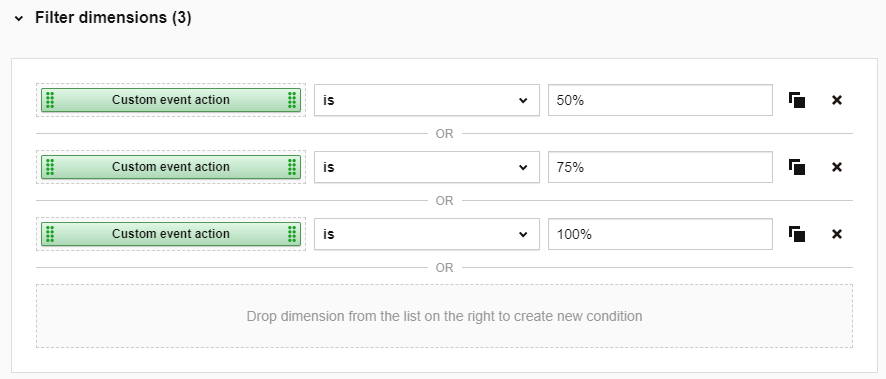
You need to apply filters so you only see pages with 50% or more scrolled:
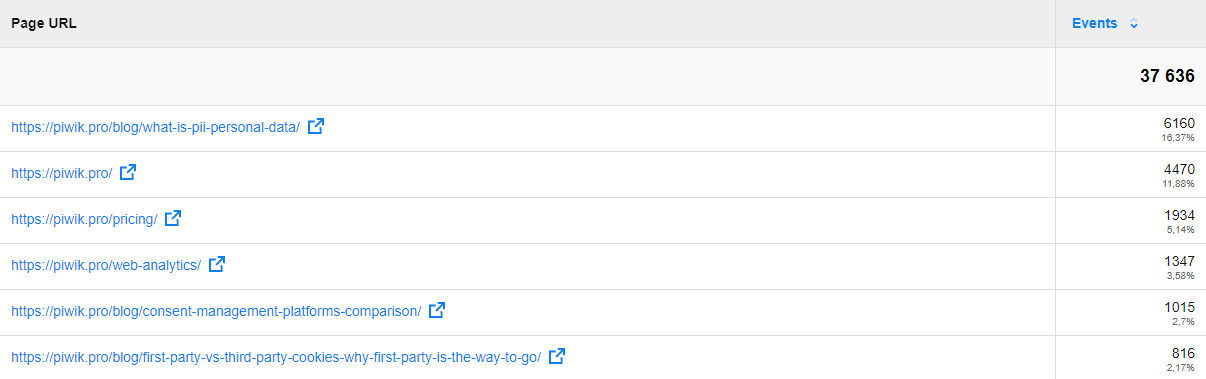
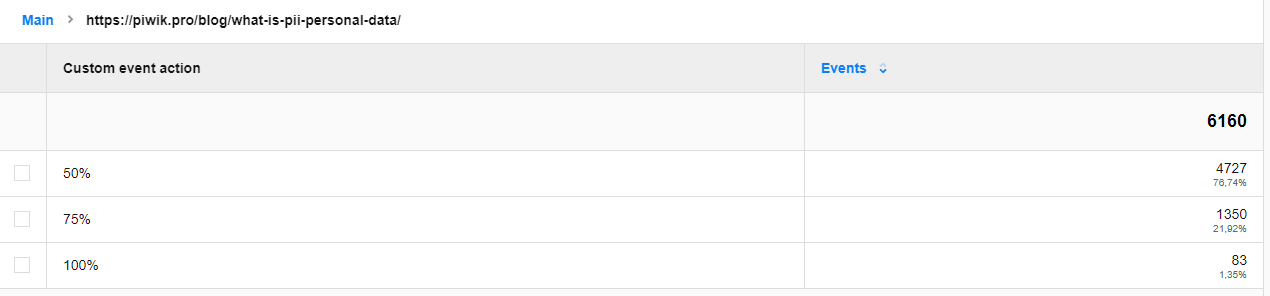
The report you create with these configurations will show pages with a 50% or higher scroll rate and will allow you to dive deeper into each URL and see specific percentages:
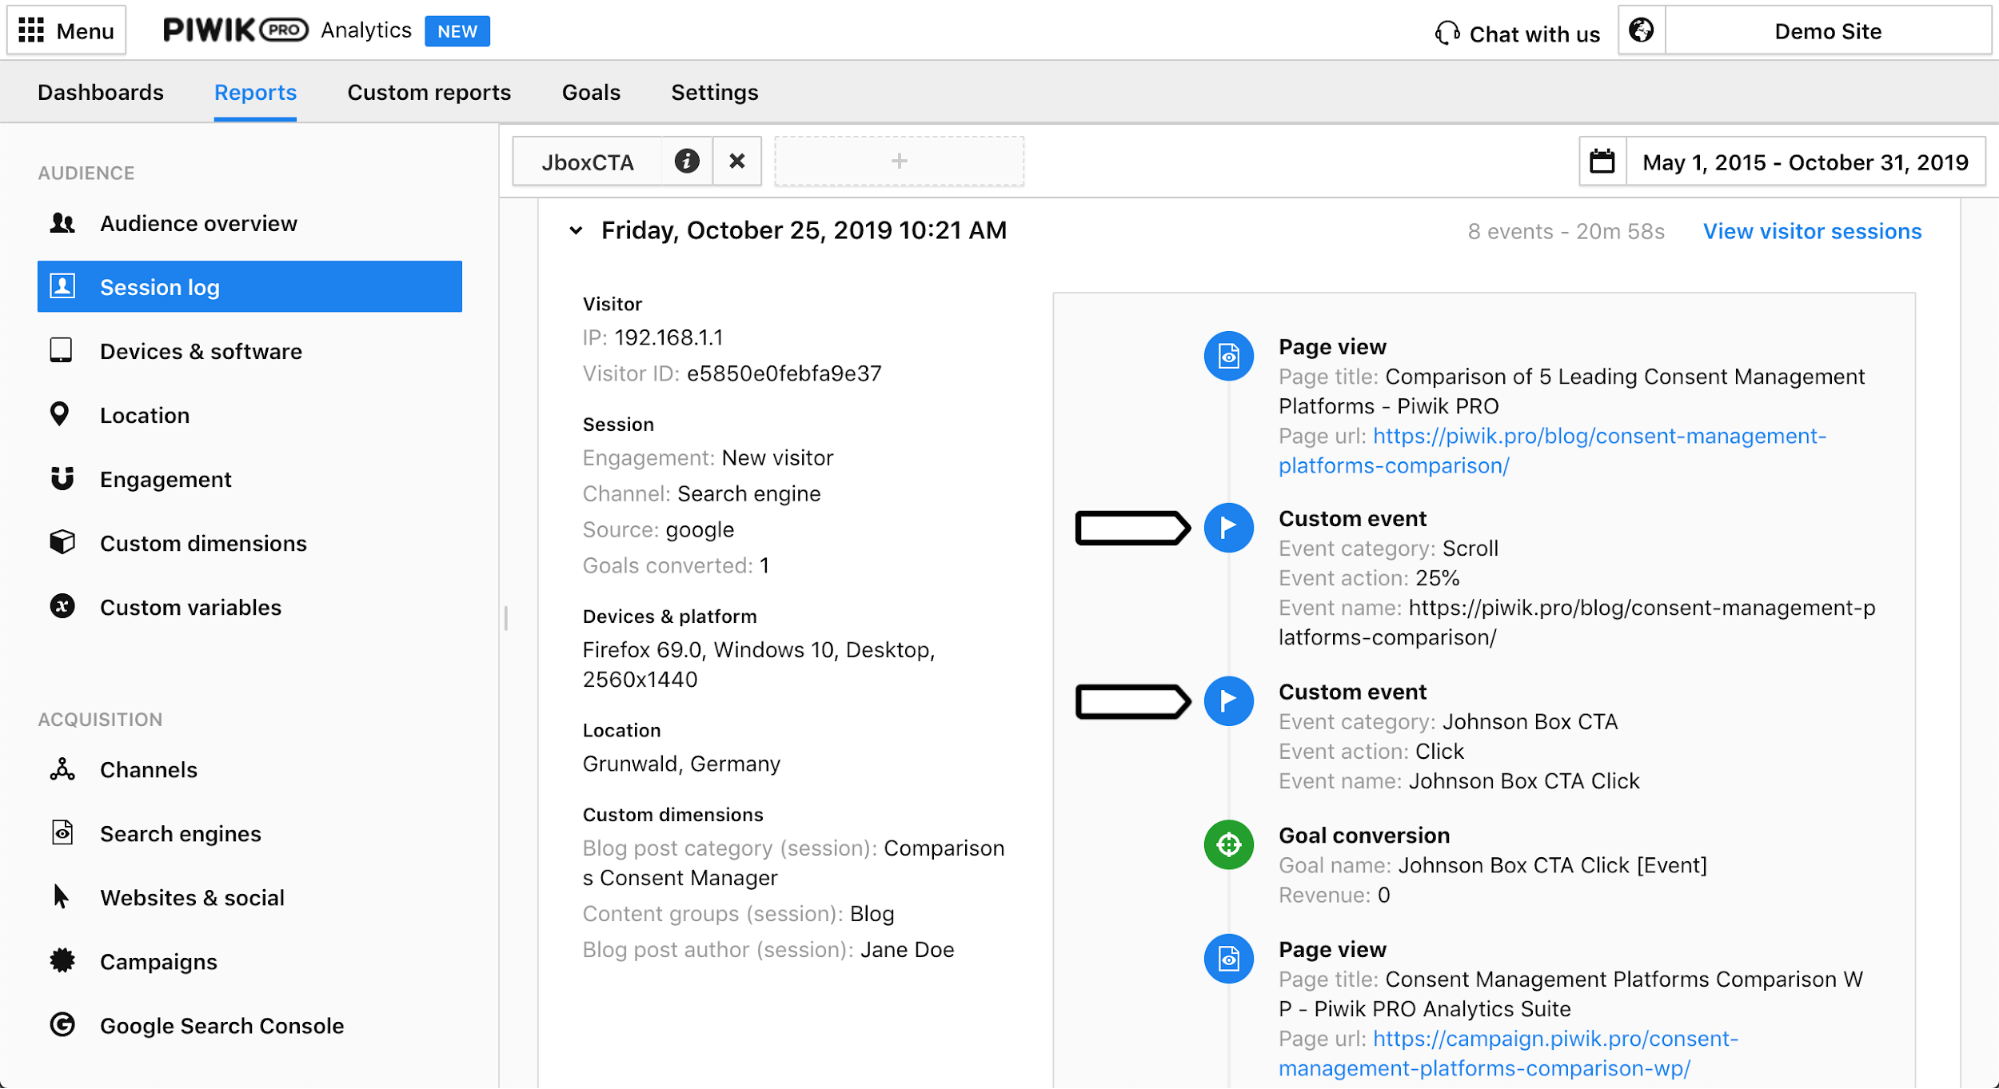
Get granular with a session log report
Another important tool in Piwik PRO for monitoring events is the session log report, which gives you a look inside the actions of every user on your website.
Find out how much time they spend on your website, and how and when certain activities were performed. Use segments as filters to narrow down the view to specific users you want to learn more about.
Don’t forget about this option as the more granular your analysis is, the more precise your data-driven your decisions will be.
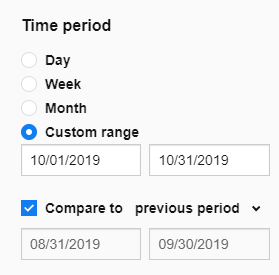
Comparing data over time
It’s easy to explore events using the “Compare to” feature. You’ll see two time periods side by side with all the corresponding data. Pick a preset range or create a custom one.
The “Compare to” option allows you to analyze time periods. You’ll find this feature in the date range selection.
You can also display event reports organized by category, action, and name all at the same time. This is all the more beneficial when you need further data transparency.
Get more insights using events as segments
Where do people who scroll 100% on blog posts go after they’re finished reading? What’s the click path for prospects who use the contact us button? Are highly engaged people more likely to convert? Find the answers to questions like this by building segments from events you’ve already created.
Use event-based segments to analyze Piwik PRO reports and get information about these groups such as:
- device type
- entry or exit pages
- search engines
- campaigns that brought them to your website
Here we will create a segment based on a custom event (75% scroll) and compare it against all visitors:
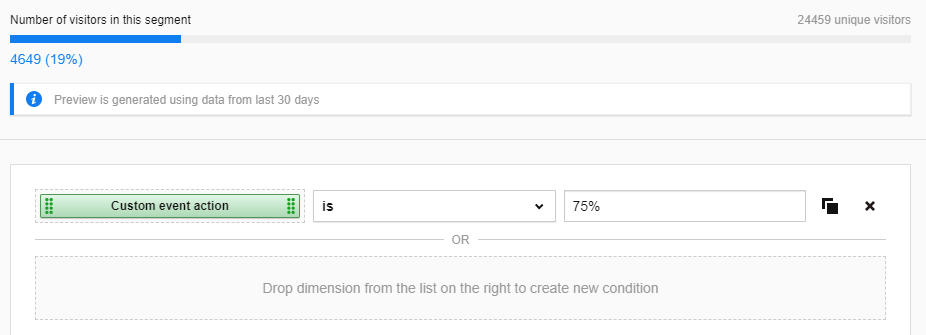
Apply segments as a filter in any report:
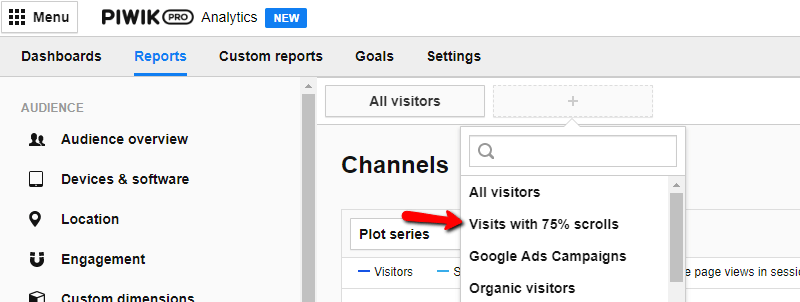
Compare segments with each other like in this example of a Channels report with “All visitors” and “Visits with 75% scrolls”:
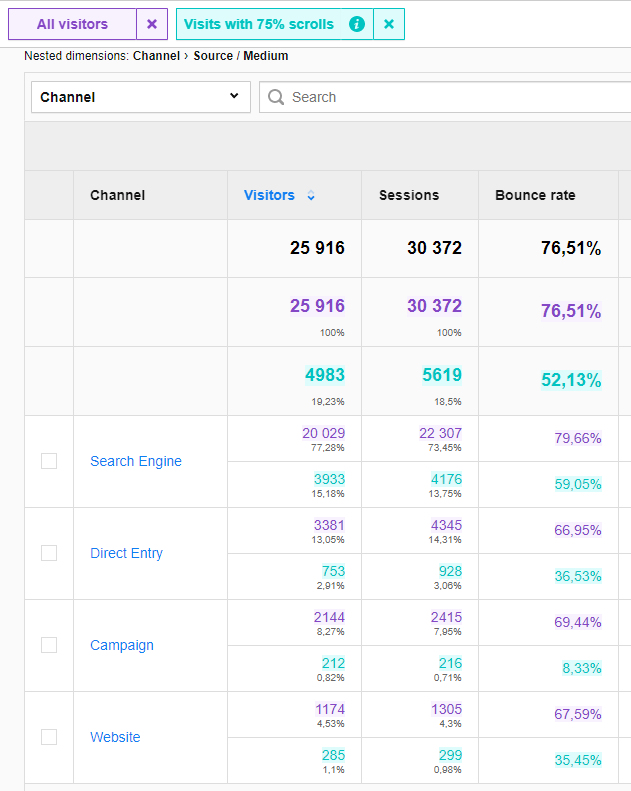
Export reports in different file formats (including CSV, XML, JSON or PDF) and integrate them into your Piwik PRO Dashboards.
Remember: your reports can reveal errors in your naming conventions or the incorrect execution of an event. Look for discrepancies or obvious omissions of data recorded as a clue to go back to the implementation stage.
Conclusion
When used correctly, event tracking will quickly become an indispensable tool in your analytics arsenal. Its biggest advantage is the ability to observe almost every possible action undertaken by your visitors and the capacity to segment groups of users to obtain valuable insights from reports.
Remember, no tool will work optimally when deployed improperly. Always remember to synch with your development team, stay current with tips & tricks, and follow product updates to achieve the best results. Don’t hesitate to reach out to us for more information about implementing custom event tracking!